文章撰寫日期︰2014/01/04 12:36
cocos2d-x使用版本︰2.1.4
一、前言
廣告是app開發商的獲利方式之一,
Google的Admob更是眾多開發者的選擇。
因此學會如何串接Admob也變得非常重要。
二、文章開始
第1步 下載ios-Admob套件
先到
Google Admob網站下載Admob
第2步 添加Admob Library檔至遊戲專案
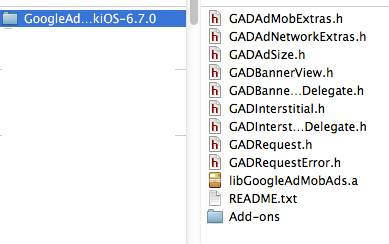
我們將下載後的檔案解壓縮,
放在常收納套件的收藏資料夾底下。
(我放在ios/third-party/目錄底下)
 |
| 解壓縮下載完後的Admob套件 |
在Xcode的遊戲專案,
按右鍵,選擇Add Files to "您的專案"。
選擇Admob套件剛才存放的地方
新增後,在專案資料夾就看到Admob的套件檔添加進來了。
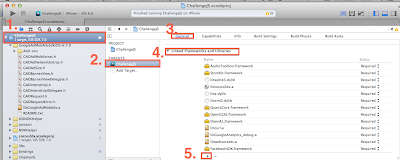
第3步 添加Admob需要用到的Framework
依照Admob官方的說明,
在使用Admob我們需要下列這些Framework
- AdSupport
- AudioToolbox
- AVFoundation
- CoreGraphics
- MessageUI
- StoreKit
- SystemConfiguration
 |
| 添加Framework的方式 |
第4步 設定-ObjC屬性
- In Xcode's project navigator, press the blue top-level project icon.
- Click on your target, then the Build Settings tab.
- Under Other Linker Flags, add
-ObjC to both
Debug and Release.
第5步 添加Admob code到程式裡
如果你接下來想照著官方教學繼續這麼做,
我會建議不要。
為什麼?
如果你剛才一直照著我說的,
跟著官方step by step加入Admob,
那麼你現在可以試看看按Run來啟動專案。
第6步 error解除
啟動後,
Shit!無法執行!
你會發現編譯器告訴你︰
Admob裡有一個叫GoogleAnalytics的東西,
main.m檔要求compiler在編譯這份文件時,
這個m檔需要使用ios的ARC機制!
我的經驗是不要干脆不要使用GoogleAnalytics,
因為我花了一天還是處理不完,
沒完沒了。
所以就把它刪掉了。
再次執行,
仍然無法編譯成功。
這次的錯誤是找不到Library。
第7步 重設並整理Library路徑
Target選擇我們的專案,
選擇[Build Settings]
找到Search Paths後,
在Debug列表點擊2下。
發現原本的路徑全跑掉了,
只好重設。
因為我是用Javasript來寫cocos2d-x,
因此上面的library看的到有使用spidermonkeyscripting/javascript/spidermonkey-ios/lib\。
將上面3個路徑改到實体路徑
\"$(SRCROOT)/../../../scripting/javascript/spidermonkey-ios/lib\"
變成
/Users/lp43/cocos2d-x/cocos2d-x2.1.4/scripting/javascript/spidermonkey-ios/lib
依此類推。
然後,
因為剛才我們已經將Google Analytics(Google追蹤)套件拿掉了,
因此上面紅框的部份都可以刪掉。
第8步 確認專案已修復並可執行
這時候再重新run一次專案,
發現專案又復活了,可以正常執行。
第9步 添加Admob code
現在可以回到官方的admob教學流程了,
在RootViewController.h添加code如下
#import

#import "GADBannerViewDelegate.h"//加入這行
@class GADBannerView;//加入這行
@class GADRequest;//加入這行

@interface RootViewController : UIViewController//加入這個Delegate
- (void) SampleSelector:(NSObject *)prms;

@property(nonatomic, strong) GADBannerView *adBanner;//加入這行
- (GADRequest *)request;//加入這行
@end
然後,
在RootViewController.mm加入
#import "RootViewController.h"
#include "IOSNDKHelper.h"

#import "GADBannerView.h"//加入這行
#import "GADRequest.h"//加入這行

@implementation RootViewController

// Override to allow orientations other than the default portrait orientation.
// This method is deprecated on ios6
- (BOOL)shouldAutorotateToInterfaceOrientation:(UIInterfaceOrientation)interfaceOrientation {
    return UIInterfaceOrientationIsLandscape( interfaceOrientation );
}

// For ios6, use supportedInterfaceOrientations & shouldAutorotate instead
- (NSUInteger) supportedInterfaceOrientations{
#ifdef __IPHONE_6_0
    return UIInterfaceOrientationMaskAllButUpsideDown;
#endif
}

- (BOOL) shouldAutorotate {
    return YES;
}

//fix not hide status on ios7
- (BOOL)prefersStatusBarHidden
{
    return YES;
}

- (void)didReceiveMemoryWarning {
    // Releases the view if it doesn't have a superview.
    [super didReceiveMemoryWarning];

    // Release any cached data, images, etc that aren't in use.
}

- (void)viewDidUnload {
    [super viewDidUnload];
    // Release any retained subviews of the main view.
    // e.g. self.myOutlet = nil;
}


- (void)dealloc {
    [super dealloc];
}
- (id)initWithNibName:(NSString *)nibNameOrNil bundle:(NSBundle *)nibBundleOrNil {

    if ((self = [super initWithNibName:nibNameOrNil bundle:nibBundleOrNil])) {

        // 告訴NDKHelper說 RootViewController會回應來自C++的message
        [IOSNDKHelper SetNDKReciever:self];

    }
    return self;
}
- (void) SampleSelector:(NSObject *)prms
{
    NSLog(@"Objective-C端的SampleSelector被呼叫了");
    //加入底下
    // Initialize the banner at the bottom of the screen.
    self.adBanner = [[GADBannerView alloc] initWithAdSize:kGADAdSizeBanner];
    // Note: Edit SampleConstants.h to provide a definition for kSampleAdUnitID before compiling.
    self.adBanner.adUnitID = @"填上你的admob_id";
    self.adBanner.delegate = self;
    self.adBanner.rootViewController = self;
    [self.view addSubview:self.adBanner];
    [self.adBanner loadRequest:[self request]];
}
//加入底下函式
- (GADRequest *)request {
    GADRequest *request = [GADRequest request];

    // Make the request for a test ad. Put in an identifier for the simulator as well as any devices
    // you want to receive test ads.
    request.testDevices = @[
                            // TODO: Add your device/simulator test identifiers here. Your device identifier is printed to
                            // the console when the app is launched.
                            GAD_SIMULATOR_ID,
                            @"如果你要在實機上測試admob,從console裡會有一串實機的編碼,填進這裡"
                            ];
    return request;
}
@end
完成了!
重新執行專案,
會發現Admob完美的岀現在我們cocos2dx的專案上。
三、結論
由於Admob套件裡的Google Analytics使用了ARC機制,
而cocos2d-x專案預設是沒有ARC的,
為了避免ARC與您的專案間改寫與設定上的麻煩,
我直接將Google Analytics套件從Admob中拆掉。
上面的教學我個人覺得已經是最快實作Admob的途徑,
也將整個步驟鉅細靡疑的交待岀來。
希望在看這篇文章的您從中受益,
縮短冤枉的時間。
謝謝您的閱讀。


