一、問題
試圖編譯外來遊戲時,因為不知道cocos2dx的遊戲引擎版本,
因此
$./build_native.sh
無法通過。
二、解決辦法
在開啟一個全新cocos2dx專案時,其實會將cocos2dx引擎需要被編譯的相關程式整個原封不動的複製到新專案中。
因此在cocos2d.cpp檔裡會記錄著該專案的遊戲版本。
路徑如下︰
YourGameProject/libs/cocos2dx/cocos2d.cpp
打開來後,
就會看到cocos2dx所使用的引擎版本號了。


$ svn add --no-ignore 欲添加至svn的檔案名稱


$ dos2unix build_native.sh build_native.sh
$ cat -v build_native.sh

$(call import-module,Box2D)
$(call import-module,external/Box2D)


cocos2d/platform/jsloader.js --> cocos2d/jsloader.js


$git clone https://github.com/lp43/EasyJSB.git


|
| 圖片說明了在cocos2d-JSB的開發環境中, EasyNDK及EasyJSB各自的定位與角色。 |
$git clone https://github.com/lp43/EasyJSB.git


$git submodule update --init --recursive
 |
| 將次模組下載下來後,project就能正常執行了。 |
文章撰寫日期︰2014/01/11 16:11
cocos2d-x使用版本︰2.1.4
Xcode使用版本︰5.0.2
文章來源︰wk3368的專檔


文章撰寫日期︰2014/01/04 12:36
cocos2d-x使用版本︰2.1.4

 |
| 解壓縮下載完後的Admob套件 |

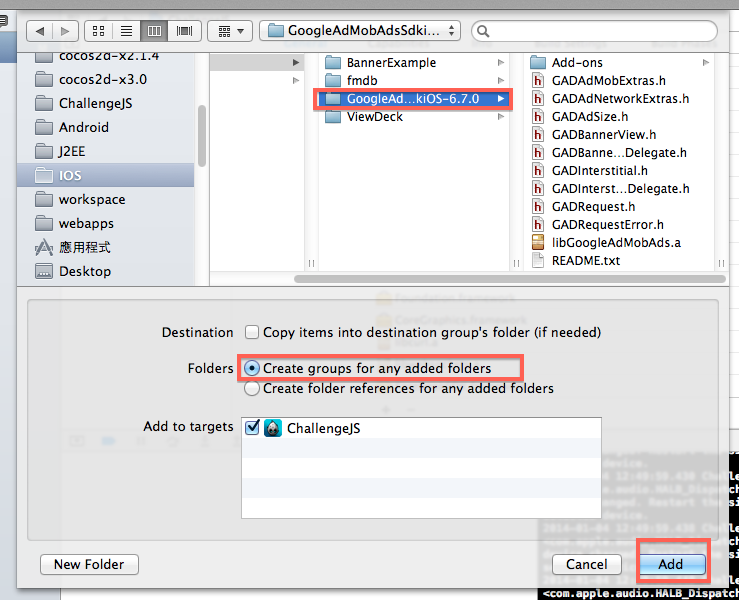

 |
| 添加Framework的方式 |
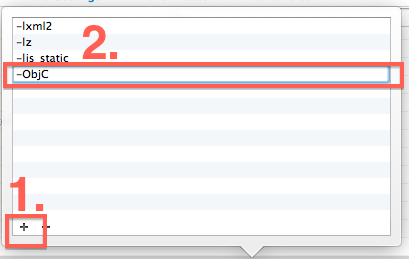
-ObjC to both
Debug and Release.


\"$(SRCROOT)/../../../scripting/javascript/spidermonkey-ios/lib\"變成
/Users/lp43/cocos2d-x/cocos2d-x2.1.4/scripting/javascript/spidermonkey-ios/lib依此類推。
#import#import "GADBannerViewDelegate.h"//加入這行 @class GADBannerView;//加入這行 @class GADRequest;//加入這行 @interface RootViewController : UIViewController //加入這個Delegate - (void) SampleSelector:(NSObject *)prms; @property(nonatomic, strong) GADBannerView *adBanner;//加入這行 - (GADRequest *)request;//加入這行 @end
#import "RootViewController.h"
#include "IOSNDKHelper.h"

#import "GADBannerView.h"//加入這行
#import "GADRequest.h"//加入這行

@implementation RootViewController

// Override to allow orientations other than the default portrait orientation.
// This method is deprecated on ios6
- (BOOL)shouldAutorotateToInterfaceOrientation:(UIInterfaceOrientation)interfaceOrientation {
    return UIInterfaceOrientationIsLandscape( interfaceOrientation );
}

// For ios6, use supportedInterfaceOrientations & shouldAutorotate instead
- (NSUInteger) supportedInterfaceOrientations{
#ifdef __IPHONE_6_0
    return UIInterfaceOrientationMaskAllButUpsideDown;
#endif
}

- (BOOL) shouldAutorotate {
    return YES;
}

//fix not hide status on ios7
- (BOOL)prefersStatusBarHidden
{
    return YES;
}

- (void)didReceiveMemoryWarning {
    // Releases the view if it doesn't have a superview.
    [super didReceiveMemoryWarning];

    // Release any cached data, images, etc that aren't in use.
}

- (void)viewDidUnload {
    [super viewDidUnload];
    // Release any retained subviews of the main view.
    // e.g. self.myOutlet = nil;
}


- (void)dealloc {
    [super dealloc];
}
- (id)initWithNibName:(NSString *)nibNameOrNil bundle:(NSBundle *)nibBundleOrNil {

    if ((self = [super initWithNibName:nibNameOrNil bundle:nibBundleOrNil])) {

        // 告訴NDKHelper說 RootViewController會回應來自C++的message
        [IOSNDKHelper SetNDKReciever:self];

    }
    return self;
}
- (void) SampleSelector:(NSObject *)prms
{
    NSLog(@"Objective-C端的SampleSelector被呼叫了");
    //加入底下
    // Initialize the banner at the bottom of the screen.
    self.adBanner = [[GADBannerView alloc] initWithAdSize:kGADAdSizeBanner];
    // Note: Edit SampleConstants.h to provide a definition for kSampleAdUnitID before compiling.
    self.adBanner.adUnitID = @"填上你的admob_id";
    self.adBanner.delegate = self;
    self.adBanner.rootViewController = self;
    [self.view addSubview:self.adBanner];
    [self.adBanner loadRequest:[self request]];
}
//加入底下函式
- (GADRequest *)request {
    GADRequest *request = [GADRequest request];

    // Make the request for a test ad. Put in an identifier for the simulator as well as any devices
    // you want to receive test ads.
    request.testDevices = @[
                            // TODO: Add your device/simulator test identifiers here. Your device identifier is printed to
                            // the console when the app is launched.
                            GAD_SIMULATOR_ID,
                            @"如果你要在實機上測試admob,從console裡會有一串實機的編碼,填進這裡"
                            ];
    return request;
}
@end
